Mass vs. Weight Gizmo & Notes
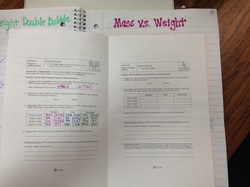
Today we completed the Mass & Weight Gizmo. Since we couldn't make it into the computer lab students took turns coming up to my desk to manipulate the gizmo.
This gizmo is avaliable to them at
www.explorelearning.com. They are encouraged to explore it on their own.
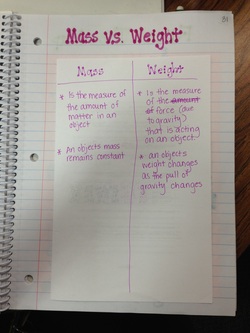
After completing the gizmo as a whole group. We created a t-chart on the front and wrote down some notes about the difference between mass and weight.
I also shared the following video with them.
Mass & Weight Double Bubble
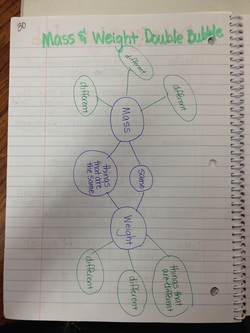
For homework students were asked to create a double bubble comparing mass and weight.
This really made them think because we had just watched a video that said Mass & Weight are NOT the same!
Density Column Lab - page 28 & 29
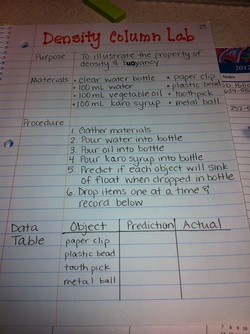
Today we built a density column to illustrate the property of density and buoyancy
The students were required to copy down the materials, procedure and their data table.
Before we start each students picked up one paper clip, one plastic bead, one toothpick, one button, and one pom pom. When they got back to their desk they had to predition if the item would sink or float in water.
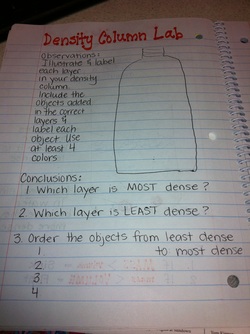
After building the density bottles students were required to illustrate their density column by including all of the items we dropped into the bottles. They also had to make sure to label all objects and liquid layers.
Then to finish the activity they had 3 conclusion questions that had to be answered.
Density Gizmo : page 26
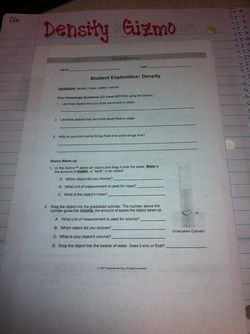
To start off our Density unit we completed a Density Gizmo as a whole group. Through the gizmo we were able to test if objects would sink or float in different liquids.
Density Notes : page 27
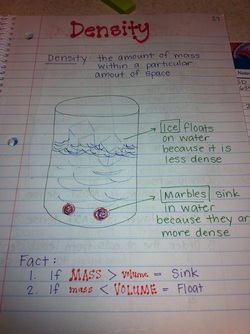
After completing the Gizmo we took a few notes in our science journals about density and made sure to include the following rules
1. If mass > volume = sink
2. If mass < volume = float
Density Probe : page 26
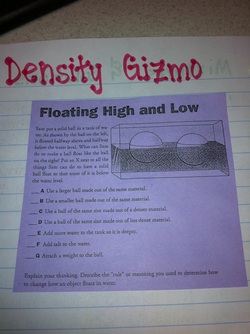
The following day I had the students answer the following density probe. This allowed them to apply what they learned abou density to another situation.
Mixtures and Solutions : Page 25
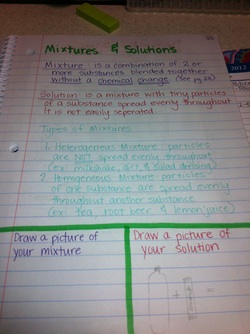
Today we took notes over the differences between mixtures and solutions. To make this lesson more fun we made a mixture of gold fish, pretzels, and fruit loops. We also created a solution using individual crystal light packets and bottles of water. Students should have illustrated their mixtures and solutions at the bottom of the page.
Messing with Mixtures : Page 24
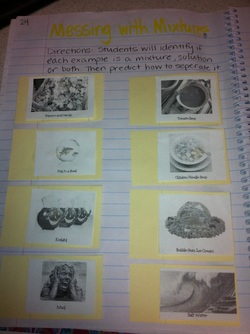
Students were given a sheet with 8 pictures on it and sentence strip. They had to create 8 flaps using the pictures and decide if each picture was a mixture or a solution. Underneath each picture they had to tell me how they would seperate the mixture or solution (is seperating the solution was not possible they were allowed to get creative).
Physical & Chemical Changes Foldable : Page 23
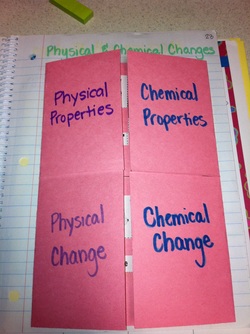
Today we talked about the differences between Physical & Chemical changes and review the difference between Physical & Chemical Properties.
We watched the a video from
Scholastic.com Study Jams
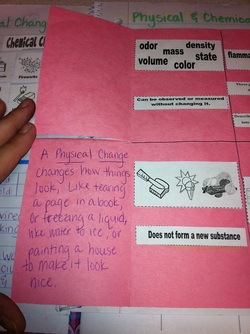
We used the following poem to help us remember that Physical Changes do not make a new substance
A Physical Change
Changes how things look,
Like tearing a page in a book,
or freezing a liquid,
like water to ice,
or painting a house to make it look nice
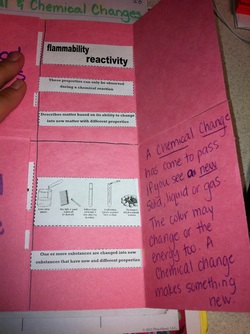
Then we wrote the following poem to help us remember that Chemical Changes do make a new substance
A Chemical Change
has come to pass,
if you see a new solid, liquid or gas.
The color may chang
or the energy too
A chemical change makes something new.
Physical & Chemical Changes Sort : Page 22
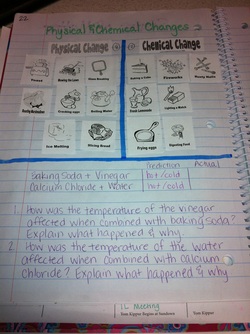
After making the foldable and watching the video students did a card sort for physical and chemical changes.
Then we did a mini activity. In one bag we combined baking soda and vinegar and discovered that we had a chemical reaction that resulted in turing our substances cooler. In another bag we combined calcium chloride and water and discovered that we had a chemical reaction that resulted in turing our substances warmer.
States of Matter Foldable : Page 21
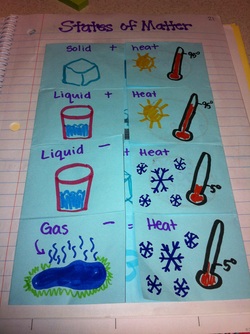
Today we created a foldable and discussed what happens to the different states of matter when you add or remove heat.
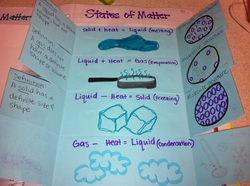
Inside the foldable we wrote what new state of matter we would change to, we definded that state of matter and drew a picture of what the molecules would look like in that state.
States of Matter Fill-In & Tree Map : Page 20
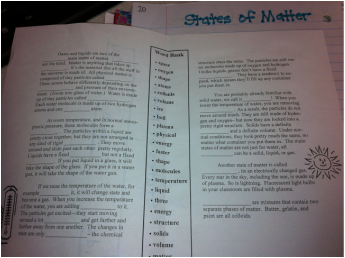
After creating our foldable we watched a brain pop video over the states of matter and the students completed this fill in activity.
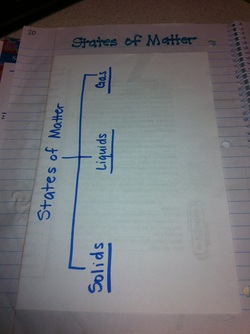
After the video students folded their fill-in in half and glued it into their notebooks. On the outside cover they created a tree map where they listed examples of the different states of matter.
Physical Properties : Page 19
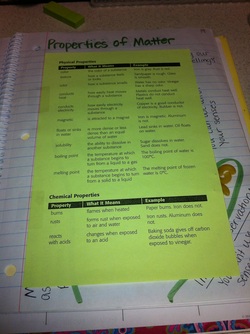
Students were given a copy of this green sheet that gives examples of physical properties thatyou can use to describe matter.
Texture & Observations : Page 19
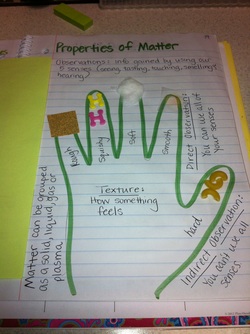
Underneath the green sheet we took notes over observations. We made sure to note the difference between direct and indirect observations. Since we are talking about using phsyical properties to describe matter we also made sure to define matter.
The hand was a way do discuss different types of textures that items can have.
Describing Matter Using Physical Properties : Pg 18
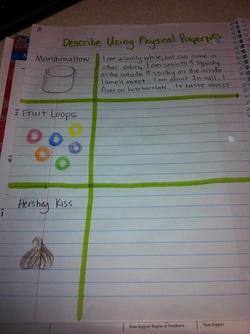
After reviewing ways to describe matter. We did an activity where students wrote "clues' to describe each item. We described the marshmallow together as a class. Then they described the fruit loops with a partner. Finally they had to describe the hershy kisses on their own.
Measurement Stations 1-3 : Pg 16
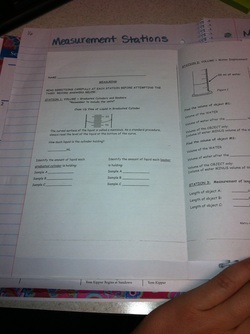
Station 1:
Students were to record the amount of liquid in 3 graduated cylinders and 3 beakers.
Station 2:
Students were to calculate the displacement of two different cubes
Station 3:
Students picked 3 different objects from around the room and measured their length in centimeters and inches
Measurement Stations 4-8 : Pg 17

Station 4
Students found the temperature of 3 different cups of water (room temp water, ice water, and salty ice water)
Station 5:
Students found the mass of 3 different cubes udint the triple beam balance
Station 6:
Students found the weight of one cude using 3 different non linear measurement standards
Station 7:
Students looked through the microscope at a slide of a fish scale and a slide of a feather and draw what they see
Station 8
Students used their senses to describe a peppermint
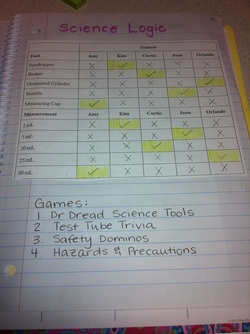
Today as a class we completed the logic puzzle in the picture. These were our clues
1. Curtis used neither the graduate cylinder nor the measuring cup.
2. Juan used a tool that had the 0mL mark at the top of it, rather than at the bottom.
3. Kim's small tool had a maximum capacity of only a few milliliters
4. Juan's liquid had a volume of 5 mL
5. Orlando's tool was more precise than Amy's tool
6. Curtis's liquid volume measurement was exactly 10 milliliters less than Amy's
After completeing this logic puzzle students rotated through 4 different science games.
1. Dr. Dread Science Tools
2. Test Tube Trivia
3. Safety Dominos
4. Hazards and Precautions
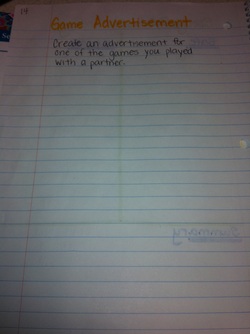
After playing each of the four games students were to create a game advertisement for their favorite game.
SpongeBob Lab Safety : Page 13
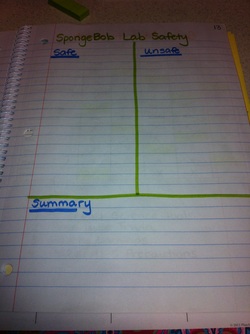
Today we read the
SpongBob Lab Safety article which we borrow from the Science Spot. As we are reading students are writing down safe and unsafe behaviors. When we are finished reading they write a summary about what they read.
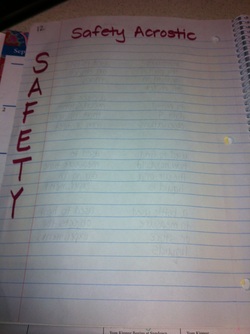
After completing the SpongBob Lab Safety reading students are required to complete and "11 o'clock" activity on page 12. Students had to write the word acrostic down the left side of their paper and then write a complete sentence that had to do with lab safety.
 RSS Feed